Friday, December 23, 2011

Building louvered doors

The new upstairs bathroom will have louvered doors on the upper cabinet and paneled doors on the lowered part. We could not find any louvered doors in the correct size so we decided to buy some premade ones and modify them to fit the opening. The first step was to take the other doors apart to salvage the pieces. Here you can see the vertical members that hold all of the individual louvers.
When they were resized the louver holes needed to be filled where the stiles will be attached. Here you can see the end holes filled.

Once the holes were filled and the louvers cut to the new length they were installed on one side.
 Once one side was is in, the other side was put in which had to start from one of the ends.
The last step was to pocket screw the stiles to the rails.
Here the two doors are finished. The next step is get them painted and installed.
 

Wednesday, December 14, 2011

Christmas Decorating

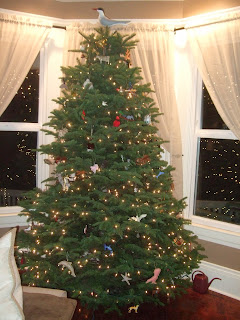
 We hung our lights on the deck outside and got our wreath and tree. Things are starting to look a little more like Christmas around here.

Sunday, December 11, 2011

Floor Urethaning Upstairs

 We got the first few coats down on the newly sanded floors and the stairs. Will do more next weekend but it's nice to see the shiny wood and the darker color coming out.

Saturday, December 3, 2011

Yard Winterizing

 We planted little evergreen trees in the planters below and removed the mums. We also cut back all the beds and put a layer of mulch on top. The lawn was mowed and the leaves raked. The lawn is ready for winter!


Sunday, November 27, 2011

Refinishing upstairs floors

Stu and Tyler worked on ripping up the carpet in the upstairs hallway and guest bedroom. They rented a sander and started taking off some of the paint layers. Progress is slow and there is more sanding to be done with a rental sander then all the finishing by hand.


Friday, November 25, 2011

Happy Thanksgiving!

Last year at this time we had no stove hooked up and no kitchen cabinets. The year before, we had no kitchen - just framed walls and lots of electrical wires hanging around. It was nice to actually be able to cook a nice dinner this year and share it with Tyler's parents.
 The turkey was fabulous!

Thursday, November 24, 2011

Mom's help with the bath closet

 Here's my Mom, Marianne, doing finishing touches on the bathroom closet.

 
Kristen painting baseboards.


Stair Stripping Continued

Here is my Dad, Stuart, stripping the landing on our stairway.  Happy Thanksgiving! The first picture shows the stairs before the stripping process.


Wednesday, November 9, 2011

Bathroom Closet Shelves

We got the shelves and shelf brackets all cut for the new closet in the bathroom. The brackets are similar to the ones that we have used in the pantry project. You can see it here holding up one of the shelves.
The shelves are out of plywood with a poplar face with two bead details.
Next up, just a couple of coats of paint on the shelves and one more on the inside of the cabinet plus all of the trim around the closet....

Sunday, November 6, 2011

Bedroom Wall Behind Closet

Here is the wall framed up. There was also another board added on the middle vertically to add some support to the closet backing. The Sheetrock was added and the plaster put on. It still needs sanding and more joint compound before texturing and painting.

Bathroom Crown Molding Up

 The crown molding is up in the bathroom. It still needs to be patched, sanded, and painted. Here you can see the backer boards in place. You can also see the inside of the closet has a few coats of paint on it.
 Here is the same spot with the molding in place. It has a few base coats of our trim paint on it. However, it will need to be painted a white white for the bathroom. We are not going with the ivory trim in the bathrooms like the rest of the house because it looks off next to the bright white toilet, tub, etc.
 This shower area will be ripped apart and we will have a new tub and tiling eventually. We are planning on doing it plain white so it will not become dated or be hard to match like this tan/blue combo.

Tuesday, November 1, 2011

Finishing up the walls and putting in lights

 Now that the walls are up all the joints need to be fared in with joint compound. We have also had a chance to get all of the lights and new fans rewired. You can see the new switch and outlet on the wall in the picture below.

The bead board backing is now put in the closet. The animals didn't like it when I did that because they were using that as a doggy door.

Lastly the new lights in the bathroom and hallway have been installed. The lights in the bathroom look like standard can lights but they are actually fans and lights.
 

Monday, October 31, 2011

Sawtooth shelf supports for the closet


 We put the shelf supports up in the closet, as well as put in the backer board. Things just need sanding and caulking and then we'll be able to paint the inside.

Sunday, October 23, 2011

Putting in the bathroom closet and new hallway

 Tyler started working on framing in the new closet in the bathroom. You can see in the picture below the closet space with no back. There will be a bottom section with double cupboard doors where we will probably put a laundry basket. The upper part will have shelves and will be where we put our towels and extra supplies.

 Here is the new bathroom doorway framed in with some sheet rock in place.
 We had to move several light switches in the process. The new ones here will be for the overhead lights and fan. There will be another switch by the sink for an over mirror light.
 This is the new hallway being started. It is in our 3rd bedroom/tv room so that room will lose a little space but will still be fairly large.


 Below you can see the end of the hallway. We will put a small closet here too to add more storage. The outlet will be on the bedroom wall and the closet will fill in the space facing you in the picture.
This is a view from inside the bedroom with the wall partially covered.