Monday, August 31, 2009

We started in on some painting last week so that some of the rooms would be somewhat finished when Kristen's parents visit next week.

The first room to paint was the guest bedroom, we had chosen what we thought was a "good" green color and bought a gallon. Well, when we fully painted the room (only one coat) it looked horrendous. The whole room looked like it was the bright green color of the fake grass that you get in Easter baskets. So, we learned our lesson and bought a sample size container of a different shade of green, liked what it looked like on the walls so repainted the room.

We think it should look nice when all of the trim in the room is repainted with the off white color that we are using throughout the house.
The second room that we started to paint is the upstairs bathroom. This room was painted a teal green-blue that was too dark and was slopped everywhere it should not have been (on fixtures, toilet, shower, floor, ceiling, door, trim). We are painting this room a warmer yellow that will take about 5 coats to finally cover the blue up. Unfortunately since this picture was taken I had to take out the sink and toilet, install new plumbing, redo the sheetrock, retexture the wall, repaint the wall and then replace the sink and toilet.

Stripping Hardware


Luck for us most of the original hardware for the house still remains on all of the doors. We have been slowly taking the mortise locks, strikeplates, handles and escutcheon plates off the doors and have been removing the multiple layers of paint by letting them soak in a bath of vinegar. Looks like the original finish on the hardware is copper plating on stamped steel.


I might look into replating them with copper when they are all done but that is not a priority right now.

Outside View


Here is an updated outside shot of the house.....looking a little better everyday.

Burst pipes...yikes

The house had been "Winterized" when we bought it, so I started the process of de-winterizing all of the plumbing. This pretty much just involves slowly turning on the water, checking all of the fixtures and valves for leaks and running the water to let the non-glycol based antifreeze flush out of the system. Well, when I slowly cracked the valve on the water main coming into the house (located in the crawl space) I immediately heard dripping somewhere in the crawl space. After alot of investigations I managed to find 5 bursts in the cold water line and 4 in the hot water line that are going upstairs to feed the bathroom.

Unfortunatly, I dont think that the company that winterized the house drained the lines. This resulted in standing water in the pipes on the North side of the house. The copper pipes were well insulated as was the wall but with no one living in the house running the water and no heat on in the house it was just a matter of time.

I had to cut some major holes in the downstairs living room and office as well as the upstairs bathroom to run new pipes but there is the positive side......sheetrock walls instead of lathe and plaster, insulation in all of the exterior walls, no water damage because the main was turned off when the break happened.

Now I just have to fill in the holes with new sheetrock, get out the joint compound and fiberglass tape and go to work. Lucky for me I have watched Marianne do this for years. It will be a little fun to try and match the existing orange peel texture on the repaired walls too.

Finished Floors!


We finished sanding and sealing the floors last week. The process took a little longer than we thought it would at first.

When we originally rented the sander I was concerned about the sanding pads being too aggressive so I bought mainly 80 grit pads. When I tried these on the floor they hardly made a dent in the existing floor finish (4 layers of paint and one of varnish). So I went down to 60...then 36....then eventually 24 grit. I think this is all due to the fact that the fir for the floors was all cut over 100 years ago and came from old growth trees with very tight growth rings.

After finishing up with the rented random orbital sander I had to go around the edges and the lower boards in the middle with the hand sander. This process took another couple of days for the two rooms. We are planning on putting in a 3/4" quarter round at junction of the baseboard and floor so I didn't have to get all of the old finish off right up to the baseboard.

Following this, I had to replace a couple of boards that were broken in the middle of the floor (I used a couple of boards from the coat closet) and use some plugs to fill holes in the floor.

And after all of this...three coats of oil based polyurathane with hand sanding between coats. It is amazing how dark the floors are, almost look like mahogany!

Saturday, August 22, 2009

Floor Sanding


Ripping up the carpet in the living room, dining room, and office was easy - the hard part was sanding 100 years of paint off the floors. Tyler worked really hard for days sanding. We don't have pictures of the finished product yet but will be sure to post them soon.

Lawn Control


After taking possession of the house, the first thing I wanted to get under control was the yard. The grass was about 4 feet tall and flopped over. I spent forever trimming hedges, weed-whacking, and mowing but we finally have somewhat of a yard.

Monday, August 10, 2009

Ideas for Kitchen Cabinets

We are still at work trying to figure out the layout of all of the cabinets but I think that we are getting closer. As we are getting there I am drawing out some of the cabinet designs on the computer. This is a picture of the cabinets along the back wall where the stove is. We thought that this was a little crowded trying to fit the stove and the fridge (behind the double panels) between the door to the pantry and the door to the back mechanical room so the design has changed to move the fridge across the kitchen (see the plan below). But, I think we got something out of doing this because we like the type of cabinets and trim that we drew.

We just signed the final paperwork on the house tonight so we should have the keys in our hands in a couple days!

Plan of the House

Kristen, Nick (friend from work) and I performed our own inspection of the house prior to signing the initial paperwork. As part of the inspection we took measurements of the house so that we could work on the concepts for a revised kitchen area. In the picture below you can see the existing first and second floor on the right and the current concept for the house with all of the revisions on the left.


As you can see the biggest change that we want to do is to increase the size of the kitchen area. We are planning on undertaking the kitchen project first and depending on the success of that we would look at working on the upstairs bathroom. We are still working out the details of what all of the kitchen cabinets, island and bathroom layouts will look like.

Thursday, August 6, 2009

Anniversary Gifts

A few more crafts - my anniversary presents from the last three years

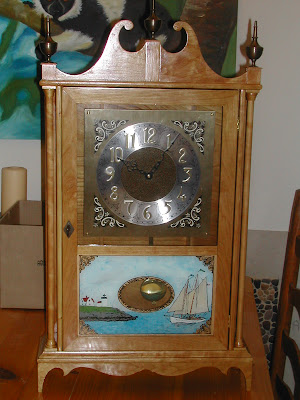
1st Anniversary - Clock
2nd Anniversary - Cotton
3rd Anniversary - Glass


Newest Bookcase


Tyler loves to make things with his hand tools. The newest addition is another bookcase. He has now made three this year and we still need more. Guess we may need to stop buying so many books...

Mosaic


Worked on this a while ago but thought we'd show some more craft projects. Not sure what to do with this mosaic, we collected stones for months from our nightly beach walks and decided to put them together into a bird.

Historical Sign

I went to the library to research the history of the house and discovered it was built for George Morseth and his family. He was a supervisor at the lumber yard that was on the Everett waterfront. The Morseth family is most well-known for it's knives, a company that was started in a shed in the backyard by Harry Morseth, a Norwegian immigrant.

Due to it's historical significance, we decided the house needed a plaque by the front door.

Stained Glass Window

The stairway has a big diamond-shaped window that looks straight at the neighbor's roof. So we decided to design and make a stained glass piece to add some charm and let in light while blocking out the neighboring house.


The House


Before: Our new house!

We're expecting to close on it in the next few days so we thought we'd set up a blog to update everyone on all our hard work in remodeling as we go.